Just to show all the new things I have had a go at this year. I'm also officially putting myself out there for commission and scenery work.
Showing posts with label The Trenches. Show all posts
Friday, 28 September 2018
Wednesday, 26 September 2018
Rommel Updates
I've not had much opportunity to get out to game recently but I'm really motivated to be modelling at the moment. As such I've decided to make myself a Rommel playkit which can be transported easily including scenery, baseboard and minis. I've no pictures for you today so you'll have to use your imagination for now.
I picked Rommel as the grid format reduces things I need to transport as well as meaning that I have a Rommel setup for the future without having to mark it out each time. I have decided to have a play at making desert scenery which I hope to make available soon at Board and Sword and online. There are also a large amount of scenarios on Sam Mustafa's website for the desert.
For the board I have taken two 2'x4' sheets of mdf and hinged them together. I then marked 4" squares across them and I've painted these using various shades of sand from tester pots. I may need to remark my grid, for most scenarios I won't need the entirety of the board but its a good space that I can always cover in a green cloth to play Bolt action etc upon.
For hills I have made some small tokens using polystyrene and filler. I finished by coating in my black paint and PVA mix, overbrushing yellow and sprinkling with sand. I also made a few with rock faces (having a play with cork boulders for first time).
![]() |
| I lied - I found a picture |
So hopefully I'm going to catalogue everything I have made this year over next couple of days. If anyone likes what they then see and would like some then contact me and I can see what I can do. If you live in North Lancashire then we can arrange to meet up and you can see my samples in the flesh.
Labels:
10mm,
3mm,
6mm,
Desert,
Rommel,
Scratchbuilt,
The Trenches,
WW2
Monday, 27 August 2018
MDF Houses - A Review
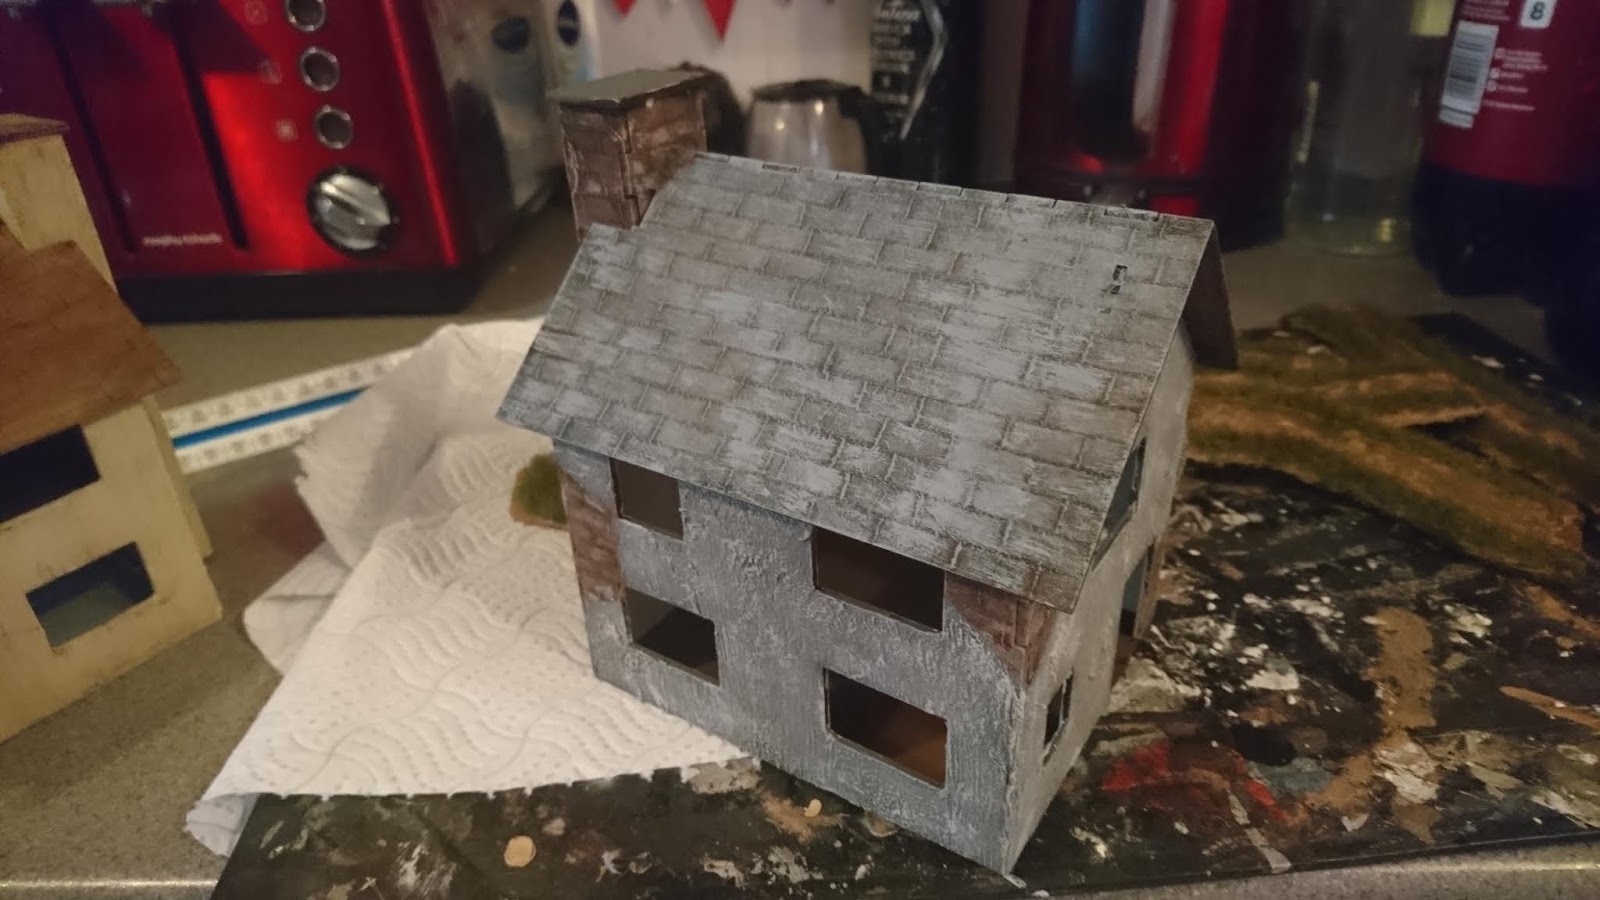
So I should have done a step by step for this but I can confirm the models went together very smoothly and seemed quite snug. In fact the middle floor needed cutting down slightly to fit - especially once painted.
The design of the models is quite good - albeit with no detailing whatsoever as well as the windows in my opinion being a little low. I'm also not a fan of how the top of the chimney looks.
The models design means that you can do whatever you want with them - for me however I prefer the details that is found in Sarissa kits.My first attempt I gave a very simple paint job and only scored in some roof tiles.
This is decent enough for a quick throw down model, however I don't like the lack of window detailing - some simple square shaped pieces to fit round as window/door frames would have added a lot.
With the second model I decided I would put more effort into the paint work although I deliberately chose not to added window frames or any additions to show what could be done with the kit as is.
Again scoring tiles into the roof, I also decided to make it look like the rendering was chipping away and so chose areas to score to represent brickwork. I did the same with the chimney.
The remaining area was covered in a thin layer of filler to create texture. The paints were applied in the following patterns:
Roof: Thin wash of black to create modulation then over brush in a dark grey.
Brickwork: Primed black, dry brush red, overbrush brown, dry brush beige, dry brush cream.
Render: Primed black, overbrush dark grey, dry brush beige, dry brush cream.
So that is what can be done with these models. I think they could do with a touch more detail around openings as well as doors. I also feel that £15 a pop is a touch steep although the simpleness allows you to model them as you wish.
Next month I may be buying a larger building such as a church so I'll endeavour to do a step by step on that. I will also take a quick shot of all of the terrain I now have for this scale and open it up to see what else people think. I am also open to do further reviews if anyone has anything they are particularly interested in.
Tuesday, 31 July 2018
Playing with Resin
Its been a while thanks to changes at home, new job and lack of computer (phone won't upload photos). However I've been doing bits here and there, and having recently been introduced to Luke's APS videos on youtube, I've had inspiration to try a few new things.
Having done a few outcrops using polystyrene and filler, I thought I'd give water effects a go. I couldn't find the two tube stuff in my local pound shops so ended up going to B&Q and getting some 2 part resin by Diall. It was a bit more expensive and I wouldn't recommend it but it was ok for a one off.
You get 2 tubes (one the resin and the other the hardener) as well as a small tray and stirring stick.
I wouldn't use the tray again mind, its too shallow to be able to stir it well and I could not get rid of the air bubbles.
The test piece I made was a small pond using polystyrene as an outcrop, sticks and prodigious amounts of hot glue for the shape and then fillered. I completed the texturing completely before applying the resin.
As I mixed the resin it did produce a silvery quality which others have mentioned so I was fairly happy it had activated but the bubbles as stated would not go.
This picture makes it look worse than it is and I will add another pour to fill it a little more.
I wanted to try the resin neat to see how it would work but I will add a little nail polish remover next time to allow it to run a bit better - it took a while to find its level by which point it had dried.
Its currently at home drying so I'll update you all tonight or tomorrow morning to let you know how it goes.
Friday, 26 January 2018
Flamethrower and Panzerschreck
So been working through my Fallschirmjager - a little each night. As such I've got a couple more teams finished up.
So I completed 4 more figures - I'm going for a bit of a mix of equipment with sand, luftwaffe blue and camouflaged helmets. I've also found that the metal figures are still a lot nicer to paint as well as feeling more solid in hand.
As with my previous models I've gone for a dusty outcrop type look to resemble these troops as they fought in southern Italy and Sicily. However despite previous posts to the contrary I've decided I will do some models with Panzerfausts to give me some more flexibility.
Panzerschreck team which for a veteran force is a whopping 104 points! Is this worthwhile in a low points game - hopefully find out soon.
On the other hand, including a flamethrower within a Fallschimpionier squad as part of an assault squad seems very cost effective. I really like how the bases have come out on these - the dust really helps to give depth.
Hopefully I will get a few more done this weekend as well as a few reinforcements to come. Handan are coming round tonight so should have a game report as well.
As with my previous models I've gone for a dusty outcrop type look to resemble these troops as they fought in southern Italy and Sicily. However despite previous posts to the contrary I've decided I will do some models with Panzerfausts to give me some more flexibility.
On the other hand, including a flamethrower within a Fallschimpionier squad as part of an assault squad seems very cost effective. I really like how the bases have come out on these - the dust really helps to give depth.
Hopefully I will get a few more done this weekend as well as a few reinforcements to come. Handan are coming round tonight so should have a game report as well.
Wednesday, 24 January 2018
WIP Flamethrower
So just a short one but wanted to share my recent Fallschirmjager advances. I'm still moving towards completing this (as a primarily if not solely infantry force) and hope to play a game shortly. I need to buy a couple more squads of infantry to flesh it out especially as I'm looking at incorporating an engineer squad in support as initially at least I'm going to avoid Panzerfausts as most reports I've read suggest they didn't have them in Italy in 1943.
As such here is the first member of that squad - he's not quite finished (still needs a dry dust).
Sorry about the awful picture quality - I'll try and get some better pictures soon as well as hopefully a battle report.
As such here is the first member of that squad - he's not quite finished (still needs a dry dust).
Sorry about the awful picture quality - I'll try and get some better pictures soon as well as hopefully a battle report.
Monday, 19 June 2017
Update (19/06/2017)
Its been a while. Life has taken over, and to be honest I'm getting a bit ground down by this project. So last night I had a review to see how much more I have to do. And its good news! (Blank Tiles show where units are missing).
Prussian Army at Lobositz:
![]() |
| Frederick's Army |
![]() |
| Army Assets |
![]() |
| Prinz von Preussens's Infantry Corps |
![]() |
| von Gessler's Cavalry Corps |
Austrian Army at Lobositz:
![]() |
| von Hadik's Advance Guard |
![]() |
| Lacy's Infantry Corps |
![]() |
| Kollowrat's Main Infantry Corps |
![]() |
| Luchesse's Cavalry Corps |
Friday, 10 March 2017
From the Tallest to the Smallest
Last night I got on with a few bits, and I'm quite pleased with the results albeit I need to start production lining and getting stuff done for both armies.
So as previously shown, I was working on my Fallschirmjager 8cm Mortar and I got this done. Meant to represent Southern Italy hence the dusty ground.
Playing DnD on Saturday so doubt I'll get much painted although I may try and get a few bits done tonight if I've got everything sorted.
![]() |
| Scale Variations |
The stages of the basing went:
- Polyfilla to give weight and texture
- Grassy patches attached (sticky bases)
- Sand mix glued on
- Models and base washed
- Dry brushed base and boots
Whilst the stages of this were drying I got in with more Lobositz bits. I already have 2 Grenadier units for the Prussians but the first one I did weren't there. As I have 4 units worth of models I figured I may as well dot he right ones and so here they are.
![]() |
| 5/20 Grenadiers |
I also completed one of the 2 bases of Austrian Artillery required.
Playing DnD on Saturday so doubt I'll get much painted although I may try and get a few bits done tonight if I've got everything sorted.
Wednesday, 8 March 2017
WIP Fallschirmjager 8cm Mortar
Not much more to show you but I did do a quick half hour session starting on my Austrian Artillery as well as continuing with my Fallschirmjager.
Still needs wash and drybrush applying as well as the base doing (should get done tonight if dry) but looks good. Also a really hefty weight with the metal figures and polyfilla base.
Looks like this weekends DnD is off unless someone else can join in (be warned that is a beginner level game).
Still needs wash and drybrush applying as well as the base doing (should get done tonight if dry) but looks good. Also a really hefty weight with the metal figures and polyfilla base.
Looks like this weekends DnD is off unless someone else can join in (be warned that is a beginner level game).
Monday, 6 March 2017
Storage Needed
Another update; damaged my shoulder at weekend (no idea how but stabbing pains aren't good for Football or painting), so a week missing training ahead (not happy).
Having said all that, the missus was down at Watford all weekend to visit Harry Potter World so after fun filled days with the kids I managed to get a bit more painting done. Finished off the last of the Prussian Infantry I need and got an Austrian unit done. Still got Prussian Dragoons and I need to order some more Kuirassiers.
Couple of things realised; Austrians will have Imperial Yellow colours for odd numbered regiments and white for even (for variety; there is more odd numbered at Lobositz so still majority Yellow).
![]() |
| Need some bigger storage |
![]() |
| Austrian 1st Infantry Regiment |
Also how little infantry (or how much cavalry?) did the Prussians have had Lobositz; including the Grenadiers that is 13 stands of infantry as opposed to about the same Cavalry!
I also am running out of bases - fortunately I ordered a load more last week and hopefully will have enough then.
Trying to arrange a D&D night but no go as yet. Got a group we're doing Lost Mines of Phandelver with - otherwise I want to start a campaign doing either Hoard of Dragon Queen or Storm King's Thunder if anyone is interested on a Tuesday, Thursday, Saturday or at a push Sunday night in Lancaster (comment below).
![]() |
| The remaining bases |
Labels:
6mm,
Austrians,
Baccus,
D&D,
JT,
Lobositz,
Prussian,
RPG,
SYW,
The Trenches,
Update,
Volley and Bayonet,
WIP
Wednesday, 1 March 2017
2 More Down
I'm sure you're sick of these now - units are coming out looking very similar (slight variations unit to unit in lapels/turnbacks/cuffs and colours) but I am moving along. I've now got just one Infantry Regiment to do for Lobositz and one Grenadier Regiment.
Last night I got 2 more done and they were the 30th Infantry and the 7th Infantry - who I've been putting off due to them having pink lapels etc and me not having pink paint (finally just mixed some up).
So after those 2 being completed I have 10 Infantry Regiments.
Final thing to mention, I'm undecided both on when and how I'm going to base these - I might get the texture on the Prussians once I'm finished with them just to give some extra protection (especially to the artillery which have the wheels hanging in the air on some of the models.
![]() |
| 30th Infantry Regiment |
![]() |
| 3rd Infantry Regiment |
![]() |
| BR: 17,20,21,27,30 FR: 3,5,7,9,13 |
So I'm getting there; just a few bits left - not sure if I'm going to get some Dragoons done or maybe start on the Austrians which I managed to spraycoat a batch of last night. Alternatively I may well go back to my Bolt Action Fallschirmjagers to mix it up.
![]() |
| Infantry, Grenadiers and Artillery, Cavalry |
Subscribe to:
Comments (Atom)


